Composting can be a physically demanding process, especially when manual turning is required. For those with physical limitations, like elbow injuries, traditional methods can be impractical.
This is where aerated static pile composting comes in.
By using a blower to aerate the compost, aerated static pile composting eliminates the need for manual turning, making it an accessible and efficient solution for anyone looking to manage their organic waste.
In this guide, we’ll explore everything you need to know about ASP composting, including a step-by-step tutorial on how I built my own system with my son’s help.
Understanding Aerated Static Pile Composting
What is Aerated Static Pile Composting?
Aerated static pile composting (ASP) is a method of composting that uses forced air to maintain the oxygen levels needed for aerobic decomposition without the need for physical turning.
This method allows for faster composting and is particularly suitable for those who find manual labor challenging.
ASP composting involves placing compost materials on a bed of perforated pipes through which air is circulated, either pushed by blowers or pulled through the pile using negative pressure systems.
How ASP Composting Works
The process of ASP composting revolves around maintaining optimal levels of oxygen and moisture.
The airflow through the perforated pipes ensures that the compost receives adequate oxygen, which is crucial for the aerobic microbes that break down the organic materials.
This method also allows for better control of moisture and temperature, speeding up the composting process and reducing odors.
Key Components of an Aerated Static Pile Composting System
- Perforated Pipes: These pipes are placed under the compost pile to distribute air.
- Blower: A device that forces air through the pipes, ensuring continuous oxygen supply.
- Compost Pile: The organic materials to be composted, such as kitchen scraps, yard waste, and manure.
Building Your Own ASP Composting System
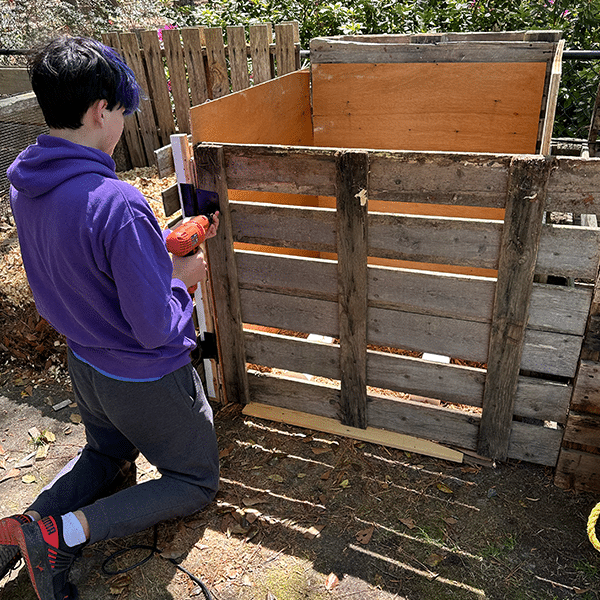
Creating an ASP composting system can be straightforward and rewarding. Here’s how my son and I built ours:
Materials needed:
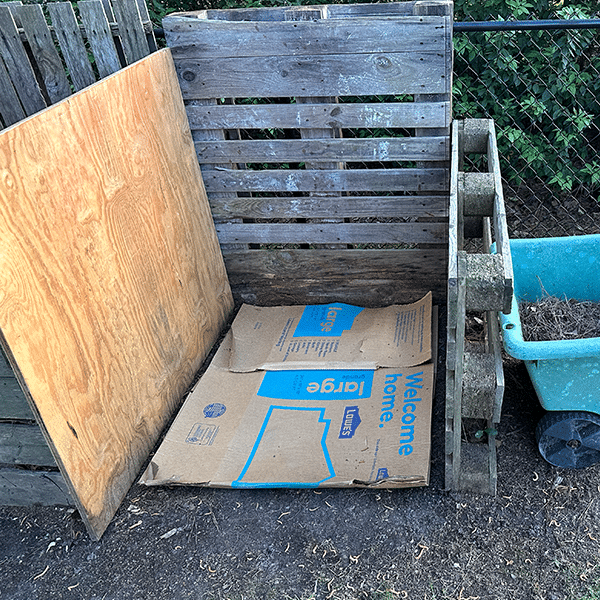
- Pallets or wood (I used free pallets)
- Plywood (free from a kitchen remodel)
- Cardboard (free)
- 4” PVC pipes
- Outdoor Smart Plug
- Blower for a bounce house
- Flexible PVC Coupling With Stainless Steel Clamps, 4″
- 12 Inch Soil & Compost Thermometer
- Hinges
- Gate Latch
- Drill with 1/8 Bit
- 90-Degree Elbow
- 4″ PVC Tee
- 4” Construction Screws
Disclaimer: We can make a small commission as an affiliate if you purchase through these links.
Step 1: Constructing the Bin
- Structure Building: We constructed the bin structure using plywood and 3” construction screws for durability. The sturdy framework ensures the bin can withstand the weight of the compost and the elements.
- Cardboard Base: We used cardboard on the bottom to suppress weeds and help retain moisture. The cardboard layer also decomposes over time, adding organic material to the compost.
- Air Containment: We covered the sides with plywood to keep the air from escaping. This ensures that the airflow from the blower is effectively directed through the compost pile rather than leaking out the sides.
- Air Distribution: We placed the PVC pipes on the base. These pipes distribute air throughout the compost pile, ensuring even aeration. Proper air distribution is important for maintaining aerobic conditions, which promote faster and more efficient composting.

Step 2: Installing the Blower System
- Blower Connection: We attached the blower to the PVC pipe using a flexible PVC coupling. This coupling provides a secure and flexible connection that can handle the blower’s vibrations without leaking air.
- Air Direction: Using a 90-degree elbow and PVC tee, we directed the airflow effectively. The elbow and tee fittings help channel the air through the PVC pipes laid out under the compost pile.
- Air Holes: We drilled 1/8 inch holes at the bottom of the PVC pipes to allow air to flow into the compost. These holes ensure that the air is evenly distributed throughout the pile, maintaining aerobic conditions.

Step 3: Adding the Door and Compost
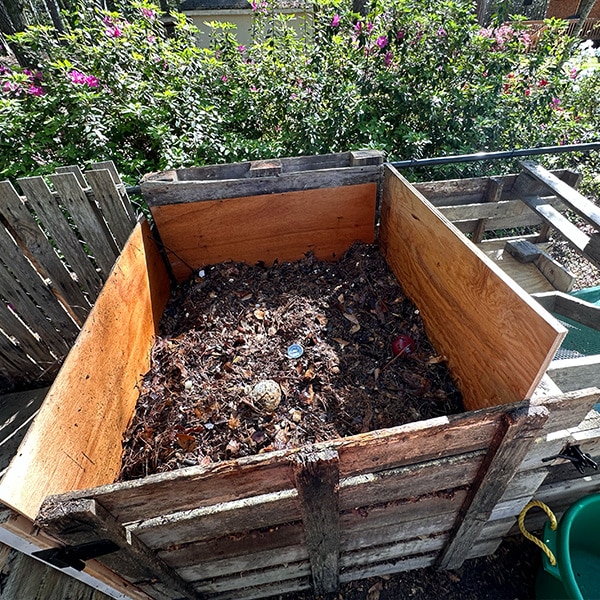
Easy Access: We installed a door at the front using hinges and a gate latch. This made it easy to add materials and access the compost. The door allows for easy monitoring and mixing of the compost when necessary.

Adding the Compost: We added a mix of brown and green materials.
Browns include carbon-rich materials like dried leaves, straw, and cardboard.
Greens include nitrogen-rich materials like kitchen scraps, fresh grass clippings, and manure.
It’s essential to maintain a balanced ratio of browns to greens, typically around 3:1, to ensure efficient decomposition.
Step 4: Aeration and Temperature Monitoring
Automated Aeration: We connected the blower to a smart plug and set it to activate for 30 seconds every hour.
You can find the IFTTT applet I made for automating the aeration process, ensuring consistent airflow throughout the compost pile. Automated aeration helps maintain optimal oxygen levels, reducing the need for manual intervention.

Temperature Monitoring: Using a compost thermometer, we monitored the compost temperature. We aimed for 10 days at 140-160°F, then 20 days at 130-140°F before letting it cool off.
These temperatures are important for killing pathogens and weed seeds, ensuring the compost is safe and ready for use.

Maintaining Moisture Levels:
Proper moisture levels are important for effective composting. Too much moisture can lead to anaerobic conditions, while too little can halt the composting process.
- Regular Checks: We regularly checked the internal moisture level using a simple squeeze test. Squeeze a handful of compost; it should feel like a wrung-out sponge, damp but not dripping.
- Optimal Moisture: We maintained moisture levels between 45% and 60%. If the moisture dropped below 50%, we re-wet the compost to maintain decomposition. Adding water or dry materials as needed helps keep the compost in the optimal moisture range for microbial activity.
Troubleshooting Common Issues
Even with an automated system, issues can arise. Here are some common problems and how we addressed them:
- Moisture Imbalance: If the compost became too dry, we added water. If too wet, we added dry materials like straw or sawdust.
- Odor Control: Proper aeration reduced odors. If odors persisted, we ensured the compost had enough carbon-rich materials.
Benefits and Drawbacks of ASP Composting
Advantages
Faster Decomposition: ASP composting speeds up the composting process by maintaining optimal conditions for microbial activity.
The forced aeration provides a continuous supply of oxygen, which is essential for aerobic microbes to thrive.
These microbes break down organic materials more efficiently than in traditional composting methods, where oxygen supply can be inconsistent.
As a result, composting times are significantly reduced, turning organic waste into nutrient-rich compost in weeks rather than months.
Reduced Physical Labor: One of the major benefits of ASP composting is the elimination of the need for manual turning.
Traditional composting requires regular turning to aerate the pile and maintain aerobic conditions, which can be physically demanding.
ASP systems use blowers to ensure continuous aeration, making composting accessible to those with physical limitations or busy schedules.
This reduced physical labor not only makes composting easier but also allows for larger compost piles, as there is no need to manually manage them.
Effective in Small and Large-scale Operations: ASP composting is versatile and can be scaled to suit different needs.
For home gardeners, small systems can be set up in backyards with minimal space requirements.
For large-scale operations, such as farms or municipal composting facilities, ASP systems can handle large volumes of organic waste efficiently.
The scalability of ASP systems makes them a viable option for various applications, from individual households to commercial enterprises, ensuring that organic waste is managed sustainably at all levels.
Challenges
Initial Setup Cost: Setting up an ASP system can be more expensive than traditional composting methods.
The cost of materials such as blowers, PVC pipes, and control systems can add up, especially for large-scale operations.
Additionally, constructing a durable composting bin and setting up the aeration system requires an initial investment.
However, the long-term benefits of faster composting and reduced labor may offset these initial costs, making it a worthwhile investment for many.
Need for Careful Monitoring: Maintaining proper moisture and temperature levels requires regular monitoring to ensure optimal composting conditions.
ASP systems, while automated, still need oversight to prevent issues such as overheating or drying out of the compost pile.
Monitoring devices such as thermometers and moisture sensors can help manage these conditions, but they add to the complexity and cost of the system.
Consistent monitoring is essential to ensure that the composting process proceeds smoothly and efficiently, which can be a challenge for those new to composting or without the time to regularly check their systems.
Wrapping it up
Aerated static pile composting offers a practical and efficient solution for managing organic waste without the physical strain of traditional composting methods.
By following this guide, you can set up your own ASP system and enjoy the benefits of rich, nutrient-dense compost with minimal effort.
Whether you’re a home gardener or managing a larger operation, ASP composting is a sustainable choice that supports soil health and environmental responsibility. Start your composting today and turn your organic waste into a valuable resource.
By combining practical tips with a touch of personal experience, this guide aims to make ASP composting accessible and beneficial for everyone.